Guest post by Lindsay Tasher, Vice Preisdent CHN Board of Trustees and quilter extraordinaire!
And just like that, Fall is back, and Gala season is here! Which means it’s time to get into holiday spirit – whether it’s Halloween, Thanksgiving, or one of the many December holidays we enjoy!
I thought for this project we’d prioritize two things that make lives easier during holiday craziness: 1) a quick project – one you can do in 1-2 hours; and 2) a project that uses scraps or reasonably modest-sized pieces of fabric. Throw in a third bonus: 3) a project that makes for an insanely popular gift –HOLIDAY STOCKINGS!

Before we start, I want to make sure anyone out there reading this who does not celebrate Christmas knows that there are so many variations you can do for this project. For example, if you want to do a non-denominational version, you can cut/quilt/piece this into the shape of a snowman or snowflake. Additionally, with Halloween approaching, you could design a pumpkin-shaped project, cut/quilt/piece the same way as I will show you below, and then fill the thing up with candy! So many options – I am just happening to do a stocking shape for this! So let’s get started.
Here’s what you will need:
- Fabric (outer fabric, inner fabric, “cuff” fabric, and “hook” fabric”)
- My stocking is about 18 inches top to bottom and I’d recommend giving yourself 12-inches in width so you have plenty of room to cut your width from heel to toe.
- Quilt batting (same 18x12 measurements for each of your two pieces)
- A 1.5 inch D-ring hook (you can find these at any craft store)
- Thick brown wrapping paper (or something similar to trace out your stocking shape)
- Sewing machine with both a regular and quilting foot
- Thread (ideally that matches/works well with your outer fabric)
- Scissors (Fabric and Regular)
- Fabric Pencil
- Ruler
- Rotary Cutter
- Iron/Ironing Board
- Cutting mat
It also might be helpful to understand what you are ultimately piecing together. The stocking is comprised of TWO identically shaped quilted pieces that get sewn “right sides” together: 1) the front piece (outer fabric, batting, and inner fabric); and 2) the back piece (same three pieces). Once they are sewn together and turned right sides out, the only other two things to do are 1) cut and sew a “cuff” piece onto the top; and 2) cut and sew a “hook”/D-Ring to the top of the stocking so you can hang it. That’s it – FOUR total pieces.
Part One: Draw and Cut
THIS will be the most complicated part of the project, as it involves some drawing skills. Or at least that is my opinion, as my drawing skills are terrible. If you can find a template online to draw your ideal stocking shape, then great. Otherwise, do your best to draw a stocking onto the thick brown paper, as this will be your guide to ensure that all of the stocking shapes you cut will be identical. You will cut SIX of these pieces in total – three front (outer, batting, and inner fabrics) and three back (outer, batting, and inner fabrics).
*TIP: when you draw your stocking, however wide you draw your top opening (I like to do somewhere between 7 and 8 inches) – keep that width the same from the top of the stocking to about three inches down. In other words, let the top of your stocking look like a rectangle before it starts angling inwards. This will make installing your cuff a LOT easier. Like this (see the rectangle I’ve drawn with a Sharpie on top?).

Once you’ve drawn/cut your stocking shape, use that to trace/cut your six pieces.
***Important: If you are using a SOLID color for your outer/inner pieces, it does not matter how you trace/cut the pieces. You can trace/cut side by side pieces and they will line up inverted just fine. Same for your batting pieces. However, if you are cutting a patterned fabric (like we are here), you need to make sure that you cut them so that the “right sides” face compatible directions when you are ready to piece them.
My suggestion is fold the fabric in half right sides together, trace, and cut two boots at the same time. Like this (this is my “inner” fabric):

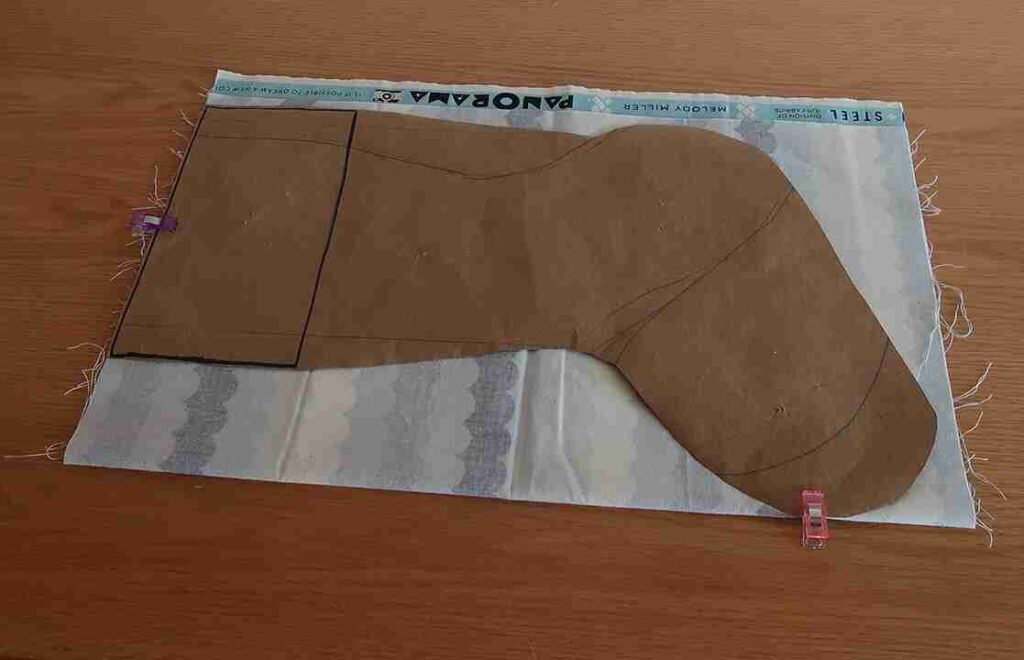
To explain it a different way, after you cut your pieces, you must be able to face both pieces “right side” up, toes together – like they’re “pigeon-toed.” You shouldn’t have the equivalent of “two left feet” or “two right feet.” See this picture of my “outer” fabric? This is what you want.

Now you have six pieces (two “outers,” two “inners,” and two “battings,”) to quilt/piece.
Part Two: Quilt and Piece
Make your two quilt sandwiches (outer, batting, inner fabrics), pick your thread, and quilt these feet however you like. And when you finish both, admire them!

Piece them right sides together and sew around the entire stocking with about a ¼ to a half inch seam allowance – except, of course, for the top! Don’t sew your stocking shut like I did the first time I made one.
*TWO TIPS:
First, you may want to secure the stitching at the top left and right of the stocking top with some extra backstitching when you start/finish. This will prevent unraveling down the road.
Second, before turning the stocking right side out, you can also use fabric scissors (with a scalloped edge) to cut the raw edges around your finished seam. Be careful not to cut the seam itself. It makes for a much nicer finish on the inside (and gives you less bulk). Like so…

Now comes the most fun part: turn your stocking right side out!!! How cool is that?

Part Three: The Cuff
Because we have to put something on the rough edge of the stocking top to make it nice.
Create Your Cuff
- Measure the width of the top of your stocking. You want your cuff fabric to measure TWICE that width plus another inch (for seam allowance). The width of my stocking is 7 inches. Doubling that = 14 inches, and then my extra inch seam allowance calls for a 15-inch-wide cuff piece. For length (top to bottom), I like to give myself between 7 and 8 inches for my cuff – so let’s go 7.5 inches for this one. So I’m cutting a 15 x 7.5 inch piece.
- Take your piece and fold it in half the 7.5 inch way (so it’s still 15 inches wide). Take the folded piece to your ironing board and iron it in half so you have a visible crease. Unfold it.

- Now fold the cuff the 15 inch way right sides together – you’re going to sew this using a seam allowance that gives you a cuff to match the width of the top of your stocking.
Remember how the width of your stocking is 7 inches? Mark whichever spot you plan to sew your seam that will make your cuff that same 7 inches. Like this.

- Sew that seam. Make sure to secure both ends by backstitching a bit when you start/stop.
- Now (here’s a slightly tricky part), you are going to unfold your cuff right sides out, but only halfway. If you do this correctly, the bottom of the cuff will look like the cuff on a pant leg, and the top part will be four separate pieces of fabric all lined up.
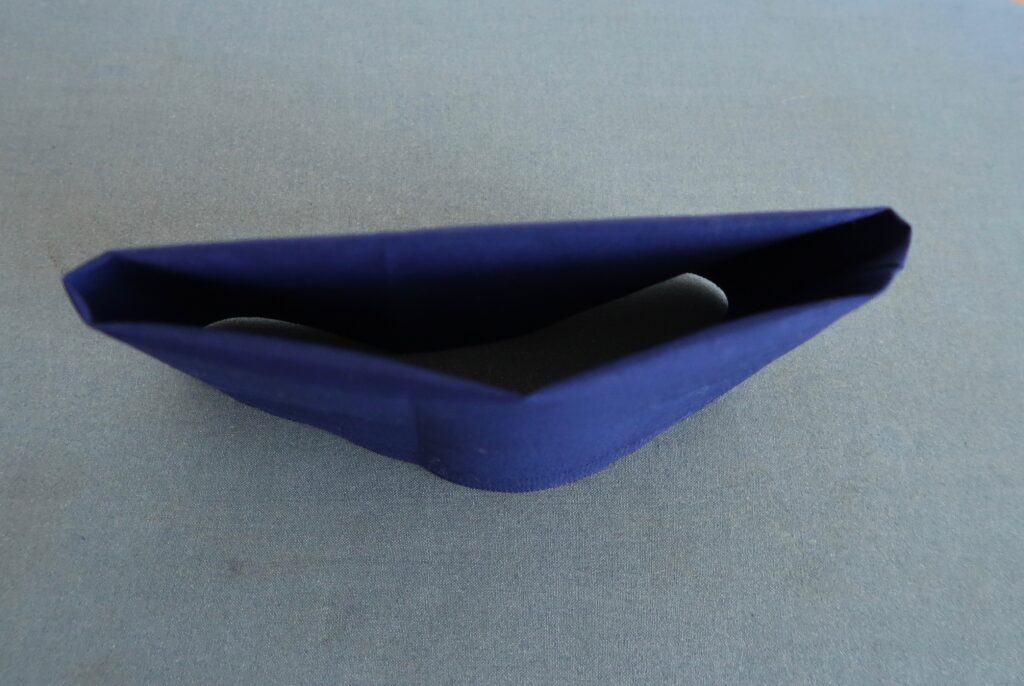

And this is what the cuff looks like next to the top of the stocking.

Install Your Cuf
- Slide the cuff “right sides out” and “cuffed pant leg side” down into your stocking. The four “loose” pieces of fabric I mentioned before should be lined up with the top of the stocking. When you clip/pin the cuff to the stocking top for sewing purposes, these four pieces should be split “two and two” per side leaving a natural hole, so you don’t end up sewing your stocking closed by accident. You will also want to line up the seam of the cuff with the side seam of the stocking. Like this…

- Take it to the sewing machine and set your foot/needle up to sew your cuff to the inner stocking with about a ½ inch seam allowance. Sew around the whole inner top to secure. As I mentioned before, when you finish sewing your cuff the whole way around, you should still be looking down a hole towards the bottom of your stocking.

- Fold the now attached cuff up over the top and around the sides. You’ll have to do some finger pressing to get it fully situated, but be gentle and you will get there…see?


Part Four: Hook and FINISH!
Honestly, this is the least important part of the stocking, since everyone’s home/hanging setup is going to be different. But here’s how I generally do it.
I take a piece of fabric that matches my cuff (I start with a piece that’s about 8 inches x 6 inches), and I fold/iron it down (outsides into middle, then fold in half again) into about a 1 inch rectangle. I sew an “inner rectangle” on the piece, and then I cut it with my scalloped scissors to a length that allows me to do three things: 1) slide on my D-ring hook; 2) fold/iron down half inch pieces on both ends; and 3) let me maneuver it into my sewing machine in a way that is workable and doesn’t force any “pulling” or stress when I sew/attach the hook piece.

Take the hook fabric, slide your D-ring over one end until it’s centered, and fold the fabric in half so that the ironed half-inch creases (a/k/a the “legs”) are pressed “right sides together” (to be clear, if you look at the above picture, the “right side” is the side facing the camera – the “legs” are pointing down).
Take that to your sewing machine, then center the piece over the inner back seam of the stocking – making sure that the “legs” remain pressed “right sides together.” Sew the piece to the stocking, a) making sure your seam secures the legs down, and b) you may also want to backstitch the seam an extra time for extra fastening. PS: this may be a bit bulky, so just be careful with your needle.

And there you have it!

Again, you can design any shape or symbol you want for the next three months of the holiday season. Just have fun, pick some crazy colorful fabrics, and give them to someone who will love them (or keep them for yourself if you love them more).
Thanks again for staying creative with me, and I hope to see you at the Gala on Saturday November 2 at the Westminster Hotel in Livingston, NJ, where a lucky silent auction winner will get to take home this set of four holiday stockings I have made!

Lindsay xoxo